

Raid Guide: Throne of the Dread Terror
-Donations:
If you have found this information to be helpful, please consider an in game donation to Dadi (on Arkenstone) or better yet a couple of dollars to buy me a beer.
Every Bit Helps Keep The Site Going
Last edited April 10, 2017.
Disclaimer: There is always more than one way to complete content in LOTRO. My guides do not make use of exploits.
Raid Locks: Raid locks are designed to save your progress. It also prevents the farming of any one section of a raid. For Throne of the Dread Terror the locks reset every Thursday morning at 6:00am EST. They are only applicable to the T2 version of the raid.
When you run this raid on T2 you will receive raid locks for each boss that has been completed. Note; you inherit the highest raid lock in the group. There are no raid locks for T1.
Example; if you join a group to kill boss 3 and you have no raid locks yourself, the moment you enter the instance you will inherit locks 1 and 2. If you defeat boss 3 with the group you will now have locks for it.
Raid Lock Bugs: As of the launch of this raid until the date above, there are bugs with the lock system.
- If you are in a T1 group and someone has T2 locks you will inherit them. This does not affect anything related to T1. However, if you want to run T2 you have to be mindful of the locks you will inherit.
- If someone in the group has boss 5 locks (fromT2) and you are attempting to complete a full run at T1, there is a good chance the raid will bug out at boss 5 and you will not be able to progress.
What Locks Do I Have: You can easily see the locks that you have in two ways;
- Press O on your keyboard (default key for the social panel). Then click the Group Stage Info tab. It will list all the locks you have.
- Type /raid locks in the chat window and it will display the locks that you have. Note a Flag is the boss that is available. Essentially it is lock +1.
Loot: Armour Pieces
Map

Boss #1: Rakothas
T2 Challenge: Use no more than 1 Powder Keg during the boss fight.
Mechanics:
Method 1 (6 and 6) – Best suited for T1
- 2 groups of 6 stand on either side of the boss
- Hemorrhage tiers up on tanks, tanks swap aggro at T3 (roughly every 10 seconds) OR whenever the previous one wears off the other tank. It is essential that the tanks communicate with each other.
- Distributed damage, 5 toons stand on each tank (within 5m) to mitigate the damage.
- Adds spawn at every 20% of the boss’s health starting at the 60% mark. Kill adds via AoE through the boss (champs are great for this).
Method 2 (combo of 6/6 and 11/1) – T2C Tactic
- DPS the boss from start to finish; ignore the adds.
- Use one Powder Keg at 40% of the boss’s morale.as
- Keep the groups split 6/6 until the boss reaches 40% morale (powder keg dropped). 5 players (not tank) switch to the other side as soon as the boss drops to one knee. It is crucial that the tank on the side you are switching to has the aggro (and hemorrhage debuff) so if need be, wait for it.
- Cappy works well as the lone tank after the switch because they can use Last Stand (keep DNF on them too). If the Cappy dies the other tank grabs the boss and switches sides.
- AoE and stuns are encouraged to keep the adds in check.
- Cappy kites the boss (if need be).
Additional Info
- When the boss gets down to 25% health he gets an Enraged buff (+100% damage). Make sure an Oathbreakers is available to burn him from 25% to dead ASAP.
- Powder Kegs (located at the tops of the ramps) can be used to remove the boss’s damage buffs; place them such that the two groups and the keg make a triangle equidistant from each other. This will allow for the keg to debuff the boss without damaging the group. In T2C you can only use one keg; best to do it at 40% of the boss’s morale.
- The adds get an Enraged buff (+100% damage) when they reach 40% of their health. There are two strategies for this; ignore the adds and do no AoE, thus the adds never get the buff. This requires solid tanks and healers. The other is to all out AoE through the boss to ensure a number of the adds die. Most groups elect to kill the adds that spawn at 60% of the boss’s health, and then AoE the rest through the boss.
- Many cooldown skills (i.e. Do Not Fall This Day) can be used prior to starting the fight and they will immediately reset.
- A solid group should have the boss down in 90-120 seconds (T1)
Loot
[embedyt] http://www.youtube.com/watch?v=nDE9lE02mfU[/embedyt]
Gauntlet 1
After Rathokas is dead you will make your way to the Mumaks via a gauntlet of mobs. Stay to the left side of the path and hug the rocks as you turn the corner and you will aggro less of them overall.
Add Order: Warmasters > Death Chanters > Archers > The Rest
Boss #2: Mumaks (Set-Akaji / Arpong-Dokh / Ku-Nerpag)
T2 Challenge: Complete the fight without a single player being killed by the Mumaks.
Mechanics:
General:
- DNF the kite tank just before you start
- At 70%, 55%, 40%, and 25% of each Mumak’s health there will be adds that spawn.
- Never use AoE skills if another Mumak is in the DPS group.
- When one of the Mumak’s health gets below 50% the reinforcements start spawning every 75s.
- Stampeders come at 68s intervals; jump on rocks to stay out of their way; or just avoid them (there are many safe spots).
- At intervals you may get a coloured eye over your head. This means that a Mumak is targeted on you; it will come to you, raise its paws and then hit you. In doing so, it does decent damage and stuns you and anyone within 5m of you. If you get an eye, call it out and move away from the group (but stay in a safe area). If the Mumak is on the other side of the instance it will not reach you before the eye wears off. If it does reach you, get ready to move moments before it raises its paws and hits you.
- Stay out of targeted circles. Circles spawn on players (from the archers atop the Mumaks), so the tighter the group, the less the circles are spread out (but their damage is stacked). An alternative to players standing on top of each other is to spread out by at least 5m of each other (diameter of each circle), thus ensuring that there is no stacking damage. Each circle does 40% of your morale in damage.
Map (click to enlarge):
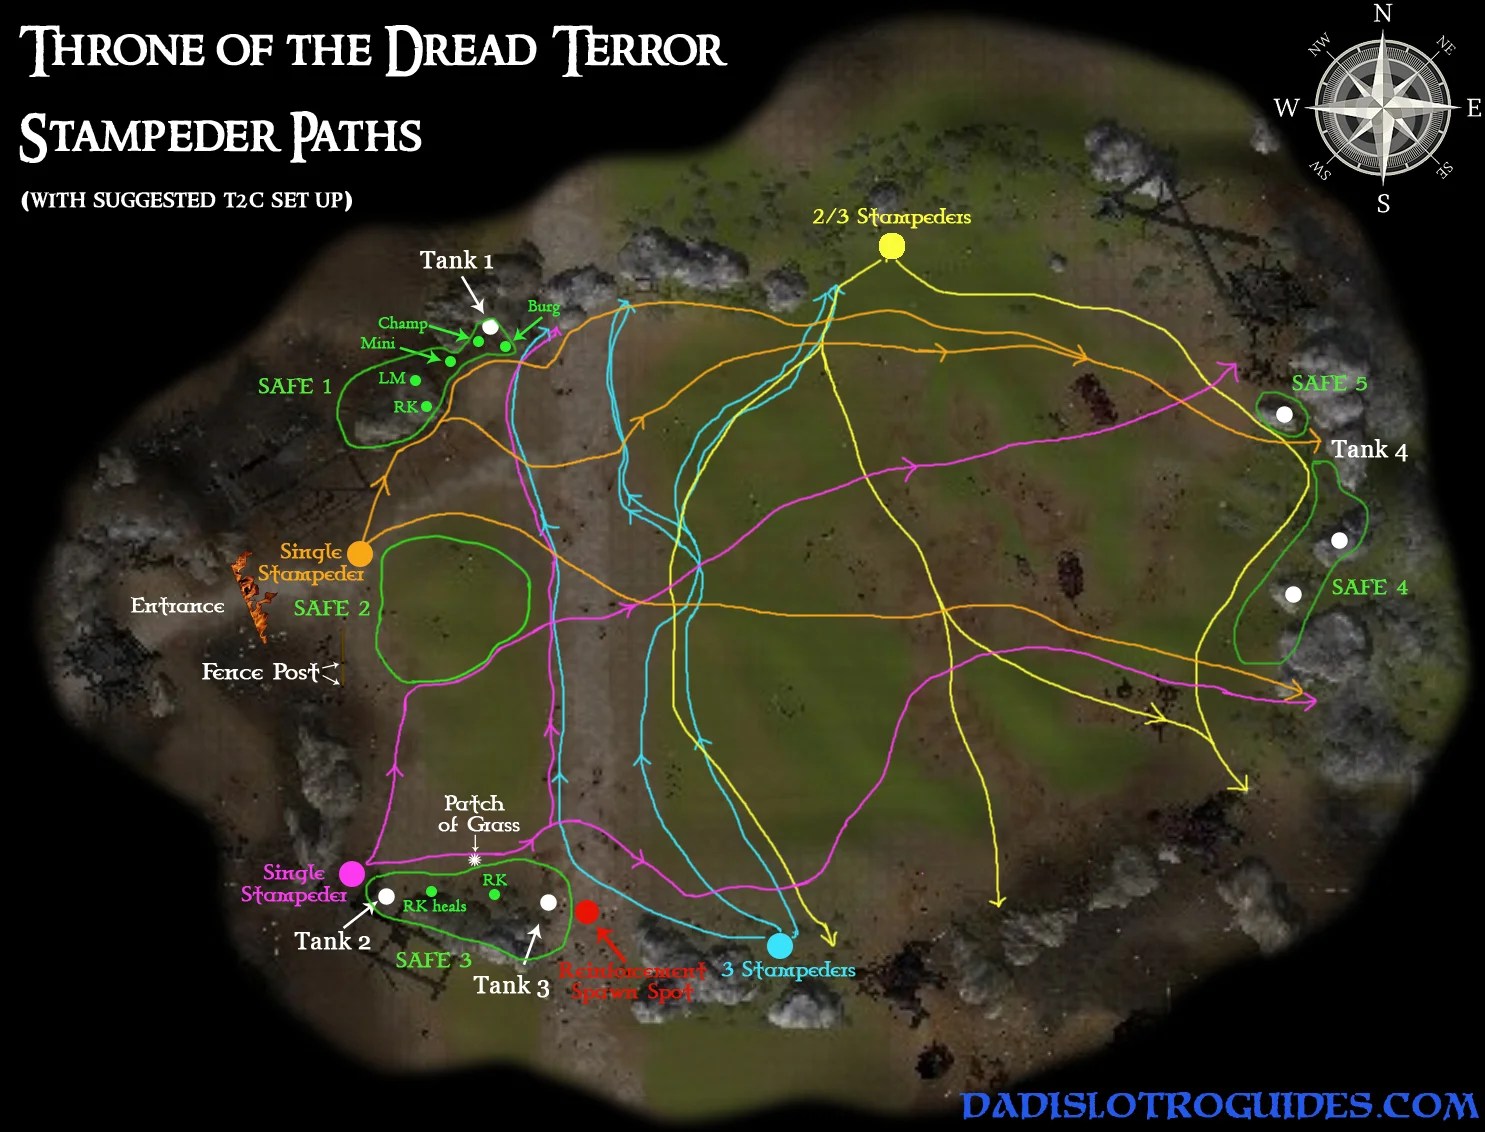
Stampeder Paths:
The Stampeders walk along set paths. The coloured lines on the map represent the path(s) that each Stampeder can take.
PINK – Always only 1 Stampeder at a time.
ORANGE – Always only 1 Stampeder at a time
BLUE – Always 3 Stampeders at a time
YELLOW – 2 to 3 Stampeders at a time.
Method 1 (T1 only): Best suited for groups that have excellent DPS and tanks (essentially near T2 ready)
- 3 Mumaks in play.
- Run to the Safe 2 or Safe 3 (stand by rocks) spot of the arena. All ranged classes should spread out 5m from each other. This leaves room for the archer circles (see above) to not stack.
- Main tank kites Set-Akaji and Ku-Nerpag away from the group to Safe 4 / Safe 5 areas. No heals should be needed for this tank (if needed swing by the group and get a top up). Stay away from the Stampeders, they will one hit you on contact (see map for paths).
- One tank pulls Arpong to the DPS group.
- Burn down one Arpong as quickly as possible, then clear all adds.
- Kite tank brings the other two Mumaks to the DPS groups (be careful of Stampeders). The main tank grabs Set-Akaji and adds. The kite tanks grabs Ku-Nerpag and runs back to the Safe 4 / Safe 5 areas.
- Burn down the adds. DPS Set-Akaji as fast as possible, then clear all the adds.
- Kite tank brings the last Mumak to the group. Burn down the adds and then Ku-Nerpag.
- Add Order: Warmasters (they shield the other adds) > Champions > Archers > Spearmen
Method 2 (T1 only): Best suited for groups that have moderate DPS and/or moderate tanks
- 3 Mumaks in play.
- Run to the Safe 2 or Safe 3 (stand by rocks) spot of the arena. All ranged classes should spread out 5m from each other. This leaves room for the archer circles (more later) to not stack.
- One tank kites Set-Akaji and Ku-Nerpag away from the group; Safe 4 and Safe 5 areas. No heals are needed for this tank (if needed swing by the group and get a top up). Stay away from the Stampeders, they will one hit you on contact (see map for paths).
- Main tank pulls Arpong to the DPS group.
- LM keeps anti-stun on the main tank at all times.
- DPS Arpong to 70% and STOP. Kill all the adds that spawn.
- Using no bleeds or damage over time skills (DoTs), DPS Arpong to 55% and STOP. Kill all the adds that spawn.
- The kiting tank now brings his Mumaks to the DPS group. The kite tank grabs Arpong and the main tank grabs Set-Akaji and any adds. The kite tank runs back to the Safe 4 and Safe 5 areas being careful to avoid the Stampeders.
- DPS the adds down (if there are any) and then Set-Akaji to 70% and STOP. Kill all the adds that spawn.
- Using no bleeds or damage over time skills (DoTs), DPS Set-Akaji to 55% and STOP. Kill all the adds that spawn.
- The kiting tank now brings his Mumaks to the DPS group. The kite tank grabs Set-Akaji and the main tank grabs Ku-Nerpag and any adds. The kite tank runs back to the Safe 4 and Safe 5 areas being careful to avoid the Stampeders.
- DPS the adds down (if there are any) and then Ku-Nerpag to 70% and STOP. Kill all the adds that spawn.
- Using no bleeds or damage over time skills (DoTs), DPS Ku-Nerpag to 55% and STOP. Kill all the adds that spawn.
- Burn Ku-Nerpag to zero as quickly as possible. Clear all adds after Ku is dead.
- Kite tank brings Mumaks to the DPS group. The main tank grabs Arpong and any adds. The kite tank grabs Set-Akaji and runs back to the Safe 4 and Safe 5 areas being careful to avoid the Stampeders.
- Burn Arpong to zero as quickly as possible. Clear all adds after Arpong is dead.
- Kite tank brings the last Mumak and adds to the DPS group. Everyone clears the adds and then burns Set-Akaji to zero.
- Add Order: Warmasters (they shield the other adds) > Champions > Archers > Spearmen
Method 3 (T2C): Requires everyone to know their classes well, be well geared, and be focused on the task at hand. Perhaps one of the fights that requires the most coordination in LOTRO.
Suggested Group:
4 Tanks (2 Grds, 2 Cappies)
3 Healers (2 Minis, 1 RK)
1 LM (keep anti-stun on the tank and CC Archers/Spearmen | Fire-lore on Mumaks at all times )
1 Burg (CC Archers/Spearmen and Debuff Mumaks with Double Disable at all times)
1 Champ
2 RKs (red)
Positioning (see map):
Tank Spot 1 (Group 1): 1 Guard, Champ, LM, RK (red), Burg, and Mini
Tank Spot 2 (Group 2): 1 Cappy Tank and 1 RK (heals)
Tank Spot 3 (Group 3): 1 Guard and 1 RK (red)
Tank Spot 4 (Group 4): 1 Cappy Tank and 1 Mini
- Group up to buff and then …
- Group 1 heads to the Safe 1 spot on the map.
- Group 2 and 3 head to the Safe 3 spot on the map.
- Group 4 starts at the Safe 2 spot.
General Tips:
Never kill adds that come from a source other than the Mumak you are currently fighting.d
Never use AoE skills if there is another Mumak in the group other than the one you are focusing on.
For Group 1 the kill order is always Warmasters, Archers, Spearmen, Warriors.
- Group 4 tank (and mini) kites Set-Akaji and Ku-Nerpag away from the group to Safe 4 and Safe 5 areas. Stay away from the Stampeders, they will one hit you on contact (see map for paths).
- The tank from Group 1 grabs Arpong and brings him to the tanking spot on the map.
- Group 1 DPS Arpong to 70% and stop. Kill all adds that spawn, AoE is okay.
- Group 1 DPS Arpong to 55% (stop DoTs and bleeds at 65%) and stop. Kill adds that spawn using SINGLE TARGET only. You DO NOT want to phase him past 50%.
- Group 4 brings Set-Akaji / Ku-Nerpag to Group 1. Group 1 tank grabs Set-Akaji and Group 4 tanks pulls Arpong / Ku and heads back to the Safe 4 / Safe 5 area.
- Group 1 DPS Set-Akaji to 70% and stop. Kill all adds that spawn.
- Group 1 DPS Set-Akaji to 55% (stop DoTs and bleeds at 65%) and stop. Kill adds that spawn using SINGLE TARGET only. You DO NOT want to phase him past 50% yet.
- Be sure all cooldowns are reset (Oathbreakers, Rezs, etc.).
- Group 1 DPS Set-Akaji to 50% using no bleeds or DoTs and stop. Kill adds using SINGLE TARGET only. Continue DPSing Set-Akaji to 40% (he will get an Enrage buff) and then kill adds, AoE is okay. DPS Set-Akaji quickly to 25% (stop bleeds and DoTs at around 33%). Kill the adds that spawn at 25% using SINGLE TARGET only. You do not want him to go below 24.5%.
- Groups 2/3; when Set-Akaji gets to 50% the Reinforcements will start spawning every 75s. The Guard will pick up all of the Reinforcements and ferry them to the Cappy Tank (Tank 2 spot). The Cappy will grab the Warmasters and Half-Trolls. The Guard will peel off archers, spearmen, and warriors and bring them back toward the spawn spot (but stay in heal range)[you want to be just out of range of the Warmaster shields]. The DPS RK in the group will kill the archers, spearmen and warriors in that order. Do not kill any of the Half-trolls or Warmasters. This group will repeat this every 75s. After wave 3 no more Half-trolls or Warmasters should spawn.
- Group 4 starts bringing Arpong / Ku-Nerpag back to Group 1 when Set-Akaji is at 26%. As soon as Set-Akaji hits 25% and adds spawn the Group 4 tank needs to grab Set-Akaji and Ku-Nerpag and run back to the Safe 4 / Safe 5 area. Tank 1 grabs Arpong.
- Group 1 burns Arpong to zero as quickly as possible (ignore adds). This should also kill Set-Akaji via the shared damage.
- Group 1 kills the adds using AoE.
- Group 4 brings Ku-Nerpag to Group 1. Tank 1 grabs him. Group 4 stays to help Group 1.
- Group 1 DPS Ku-Nerpag to 70% and stop. Kill adds, AoE is okay. DPS Ku-Nerpag to 55% and stop. Kill adds, AoE is okay. DPS Ku-Nerpag to 40% and stop. Kill adds, AoE is okay. Burn him to zero as quickly as possible ignoring all adds.
- Clean up the rest of the adds.
Known Bug: If you die during the fight do not retreat before all others have dies and the Mumaks have reset. Failure to do so can cause the wall of fire to stay in place and you will need to reset the entire raid.
Loot
- Worn Shoulders of the Pelennor Fields
- Tarnished Ring of the Pelennor Fields
- Tarnished Bracelet of the Pelennor Fields
- Housing Items
- Ancient Ithil-coins
Gauntlet 2
Method 1
The group must move forward together in increments; if you do not, adds will continue to spawn from behind. Target the Crushers, once they are down, move forward. Have the ranged focus on Archers as a priority as they get stacking corruptions that increase their damage (remove these). Everyone should take care to keep their backs facing away from the entrance (you can get punted and cause a wave of adds to spawn from where you just came from).
Add Order: Archers > Crushers > Berserkers > The Rest
Method 2 (T1 only)
The entire group runs all the way to the end and DPSes down the adds.
Add Order: Archers > Crushers > Berserkers > The Rest
Known Bug: If anyone goes link dead or dies and retreats it will bug the smoke wall (stays closed) and you will not be able to enter the area for Boss 3. If you die, stay dead until the gauntlet has been cleared or be rezzed, do not retreat. If someone in the group goes LD, boot them from group and re-invite after the gauntlet has been cleared.
Boss #3: Vadokhar
T2 Challenge: Only allow the boss to absorb one type of element (Fire or Gloom) and do not let the opposite Gloom get off an induction.
Mechanics:
- Tank grabs the boss and all adds that spawn. Keep them together and the group can AoE DPS.
- When the boss gets to 50%+ damage immunity (goes up in 25% increments) the tank drags him in to the MIDDLE of the puddle (fire or shadow); melee stay out. The boss will absorb it (takes a couple of seconds), removing the negative inc damage buff; melee can move in. However, it also puts a stackable outgoing damage buff on the boss (Flame = Melee Buff and Shadow = Tactical Buff). Most groups elect to use the fire puddles.
- Interrupt the boss inductions. These can be hard to see, especially if there is an LM using fire. Scroll your camera out and overhead to give yourself a better shot at seeing it (red swirling circles at the boss’s feet).
- If you get punted you will get a wound, remove it ASAP.
- Do not stand in front of the boss (unless you are the tank), he does big frontal AoE.
- At 40% of the boss’s health he will begin randomly hitting players with a Vessel of Flame debuff. The icon looks like the flame puddle icon but it has a clock on it. When the debuff expires it does damage to all players within 5m. If you get this debuff, move away from the group and yell it out so people stay away from you and the healer can focus on you.
Loot:
- Gloves of the Pelennor Fields
- Ancient Ithil-coins
- Tarnished Ring of the Pelennor Fields
- Tarnished Bracelet of the Pelennor Fields
- Battle-damaged Equipment of the Pelennor Fields
Gauntlet 3
Boss #4: The Unbroken One
T2 Challenge: Remove all corruptions (200) from The Unbroken One before killing any of the 3 mini bosses.
Mechanics (mini bosses):
- To activate the mini bosses you must kill the Black Númenórean Sorcerer – Gets a Spell-Shield buff (30s) that protects them from tactical skills and reflects 100% tactical back as shadow damage. He is not linked to any other mobs so can be burned down easily by the melee / ranged in the group.
- There are 3 mini bosses here; Neghèbh, Skelghàd, and Dhàmiz (tied together) that will not engage you until you attack them or get in proximity.
- Neghèbh has a healing corruption that should be removed when killing it. When it is standing near Nameless or Evil Men it will get a -20% incoming damage buff.
- Skelghàd gets an Ancient Defence (corruption) buff that needs to be removed when killing it.
- Dhàmiz gets an Ancient Dexterity (corruption) buff that needs to be removed when killing it.
T1: Just burn them all down
T2: 2 tanks hold aggro on the mini bosses away from the group but within heal range
Loot:
- Worn Boots of the Pelennor Fields
- Battle-damaged Equipment of the Pelennor Fields
- Ancient Ithil-coins
- Tome of the Loyal Swan Night (T2)
Mechanics (The Unbroken One):
- The initial 4 Binders hold The Unbroken One in place (cannot do damage); killing them will release The Unbroken One so corruptions can be removed and the fight begins.
- Once initially free, all classes spam corruption removals on The Unbroken One every time they are off cool down.
- Boss throws down a vortex on the ground periodically; move away from it (opposite direction) or it will pull you in; each vortex has 3 waves.
- At “x” corruptions removed, the Unbroken One gets an Ancient Madness buff (+50% melee and tactical damage and +5% run speed).
- At some point the Unbroken One gets an Untamed buff (stacks with Ancient Madness) giving +100% melee and tactical damage for 20s.
- Red eye gives 300% damage threat (cannot be removed).
- Stay out of melee range of the Oozing Darklings. They get corruptions that stack (+150% melee damage and +30% run speed). You can opt to remove corruptions from them, but doing so slows the progress on the Unbroken One. Ranged should focus DPS on them.
- On T2 the Binders (once fight starts) reflect tactical.
Gauntlet 4
There will be constant waves of mobs walking down the middle of the road. Avoid them, and do not agro them. On the left and right sides of the road there are small groups of mobs that need to be killed. In order to enter the area for Boss 5 you must kill all of the Half-Orc Marauders.
The entire group waits at the entrance to the gauntlet. The tank heads in (put DNF on them) and pulls one group of mobs at a time back to the group of players. DPS them down, rinse and repeat. There will be Sellswords in 2 (or 3?) of the groups. The Jarl in the group will put a melee reflect buff on the Sellswords; best to go single target.
Once the 6 groups of adds are down, the group can head down the right side, taking care not to aggro the straggling parade of mobs down the center. Do not get too close to the Boss #5 area or you will end up in combat; unable to eat food or switch gear. Form up well back from the Boss# 5 area.
Boss #5: The Woe of Khand / The High Sorcerer of Harad
T2 Challenge: Kill the two bosses within 10 seconds of each other.
T2 Method:
Mechanics:
- Keep the two bosses separated (pull them in to the light); you cannot damage them otherwise. One is weak to melee (High Sorcerer) and the other ranged/tactical (Woe of Khand).
- If melee classes engage the High Sorcerer of Harad it will cause people to be feared. You cannot come within melee range of this boss.
- Ranged classes will stack until eyes start. Once it is determined who has the eyes (same people will get them over and over) they move at least 5m away from everyone else. If someone dies that had an eye a new person will get their eye.
- Kill Spirits (Rangers > Warriors) when they spawn (at 80% of the Sorcerer’s health) and be sure to stack DoTs and Bleeds on them.
- DPS the High Sorcerer of Harad to 10% (RKs stop Writs at 45%). Leave one melee/ranged class on the Sorcerer, the rest switch to the Woe of Khand. Burn the Woe down. Switch back to the Sorcerer and burn fast. Keep an eye on both boss’s health to ensure you will be able to finish them off within 10s of each other.
- CC the Corrupted Crawlers ASAP (usually the Burg). Woe of Khand will say; “…and you serve your purpose.” just before they spawn.
- 1 Tank will aggro and kite Corrupted Crawlers.
T1 Method:
Mechanics:
- Keep the two bosses separated (pull them in to the light); you cannot damage them otherwise. One is weak to melee (High Sorcerer) and the other ranged (Woe of Khand).
- One tank holds the High Sorcerer in the light. One healer stays within range of this tank. The other 10 people stack on the Woe of Khand and burn him down. Then switch to the High Sorcerer.
- Kill Corrupted Crawlers (purple eye on them indicates they are transforming) ASAP.
- Ranged classes will stack until eyes start. Once it is determined who has the eyes (same people will get them over and over) they move at least 5m away from everyone. Anyone else with an eye must move 5m away from anyone else. If someone dies that had an eye a new person will get their eye.
- Kill Spirits (Rangers > Warriors) when they spawn (by the Sorcerer); they drain power. At the very least, remove corruptions.
- If melee classes engage the High Sorcerer of Harad it will cause people to be feared. You cannot come within melee range of this boss.
Loot
- Worn Legguards of the Pelennor Fields
- Housing Items
- Battle-damaged Equipment of the Pelennor Fields
Boss #6: Death of 1st Gothmog to Death of 2nd Gothmog
T2 Challenge: 20 minute Timer from the death of 1st Gothmog to death of 2nd Gothmog (port in to cage).
Mini Bosses: Gothmog (phase 1), Mordirith, and Dread-Beast
Mechanics:
- Gothmog (phase 1) – Tank and spank; watch 25% reflect of common, westernesse, ancient dwarf-make, and fire.
- Mordirith (phase 1) – He cannot be aggroed and will likely end up on the healer; ignore and focus on Dread-Beast
- Dread-Beast – Tank and spank; if you get purple eye he will chase you (ignore it).
Once the Dread-Beast is down you will be able to enter a portal that takes you inside a cavern.
Bosses: Amarthiel & Mordrambor
Mechanics:
- Switch to a single target build.
- There are 2 mini bosses for this section; Amarthiel and Mordrambor; each will become immune (90%) to damage.
- Split the raid in to two groups; one heavy with melee (stays on Mordrambor) and one heavy with ranged/tactical (stays on Amarthiel).
- One tank drag Amarthiel up the right staircase to a forge on the upper level. To do so, you must move slowly and not path over the holes in the stairs.
- One tank drag Mordrambor up the left staircase to a forge on the upper level. To do so, you must move slowly and not path over the holes in the stairs.
- Fight the bosses just in front of the forges, when they get the immunity buff, drag them in to the fire until it disappears and then move to the front of the forge again. Rinse and repeat as needed.
- When fighting the bosses keep your back such that if you get punted backward you will not fall down below.
- Amarthiel will get a buff that reflects melee for “x” seconds
- Mordrambor will get a buff that reflects ranged and tactical for “x” seconds
- Remove corruptions when you see them.
Gauntlet 5
Boss: Mordirith (phase 2)
Mechanics:
- There will be 50ish adds that spawn win waves during this fight. The adds are all ones you have seen before leading up to this point. AoE is a must.
- Sorcerer’s reflect tactical.
- Stay out of puddles.
- Interrupt the boss.
- Kill Lorniel quickly every time she spawns.
- Keep the NPC alive (you can heal him)
Add Order: Sorcerers > Archers > Siege-Breakers > Champions > Jarl > Lords > The Rest
Gauntlet 6
Boss: Gothmog (phase 2)
Mechanics:
- Tank the boss in the middle of the room at the West end.
- Do not get within melee range of the boss (he puts an eye on you that upon expiry does 100% morale damage [before mits]).
- Risen Bones (2) spawn at roughly 60% of the boss’s health (7.5 million on T1).
- I person tank the Risen Bones (2 of them) away from the group East end. Range DPS them down. When they die they drop a green cloud that does serious damage.
- Stay out of puddles.
- At “x” time in to the fight blue flames will sweep across the room from left to right (South to North); “The fires of Mordor come for you!”. You need to stay out of the flames. You can run between the pillars and go far to the right (North) during the initial wave. Once the flames reach you, run back to the middle.
- The next wave of blue flames will come after 1 minute and sweep from right to left (North to South) and so on.
Boss: Silmahtar and Calatur
Mechanics:
- Silmahtar and Calatur both reflect common, westernesse, ancient dwarf-make, and fire at 25%.
- Each tank take a boss.
- Interrupt boss inductions.
- Sorcerer’s reflect tactical.
Loot
- Chestplate
- Pocket Item
- 2 Ancient Ithil-coins
- Tarnished Earring of the Pelennor Fields
- Tarnished Necklace of the Pelennor Fields
————————————————————-
-Donations:
If you have found this information to be helpful, please consider an in game donation to Dadi (on Arkenstone) or better yet a couple of dollars to buy me a beer.
Every Bit Helps Keep The Site Going
Pingback: Throne of the Dread Terror – Raid Progression
Pingback: Throne of the Dread Terror – Difficulty Poll
Pingback: U19.2 Crafted Essences (How To)